
Finding Your Composition – Part 2
In Part 1 we explored the mechanics of composition. Part 2 explores something less tangible:
how to find those compositions in the first place.
Now that we’ve discussed the mechanics of composition in photography, it’s time to explore something deeper: composing an image through feel.
I’ve spent my entire career as an artist—25 years as a graphic designer and art director alongside being a photographer. Throughout that time, one principle has consistently guided me: learning to trust my instincts. My job was often to translate an idea into something visually appealing, resulting in sound mechanical composition through structure, layout, and balance.
Early on, I learned that if an idea felt right, it was worth exploring. If it didn’t feel right—or I couldn’t make it work—it was usually time to move on and start fresh.
Photography is no different.
A photographer who learns to trust that instinct in the field will often create stronger compositions and discover more of them. The compositional mechanics we discussed in Part 1 frequently emerge naturally when we learn to recognize and follow what draws us to a scene.
Before we get into that, let’s address a practical question.
Tripod vs. Hand-Held
There are two primary ways to photograph: with a tripod or hand-held.
I’ve used both extensively, but today I shoot from a tripod roughly 90 percent of the time. (Aerial photography is an entirely different discussion, so we’ll leave that alone for now.)
Neither approach is right or wrong. Each has advantages and disadvantages, and the best choice depends on the conditions and the scene in front of you.
Shooting with a Tripod
Pros
A tripod allows you to carefully dial in a composition and work a scene with a meticulous approach when conditions aren’t changing rapidly. It also allows you to tackle more complicated images requiring focus stacking, focal-length blending, exposure bracketing, or panoramas.
A tripod is essential for many landscape photography staples, including flowing water, blue-hour photography, and astrophotography.
On longer hikes, I often carry my tripod in my hands or tucked under an arm to save my shoulders and back. As an added bonus, it could serve as a last line of defense against an aggressive animal—though fortunately I haven’t had to test that theory yet.
Cons
Tripods can be heavy, especially on long hikes with significant elevation gain. Lightweight, sturdy models can also be expensive.
More importantly, tripods can sometimes make photographers complacent. I’ve caught myself camping on a composition waiting for conditions to improve when I should have been exploring and looking for something better.
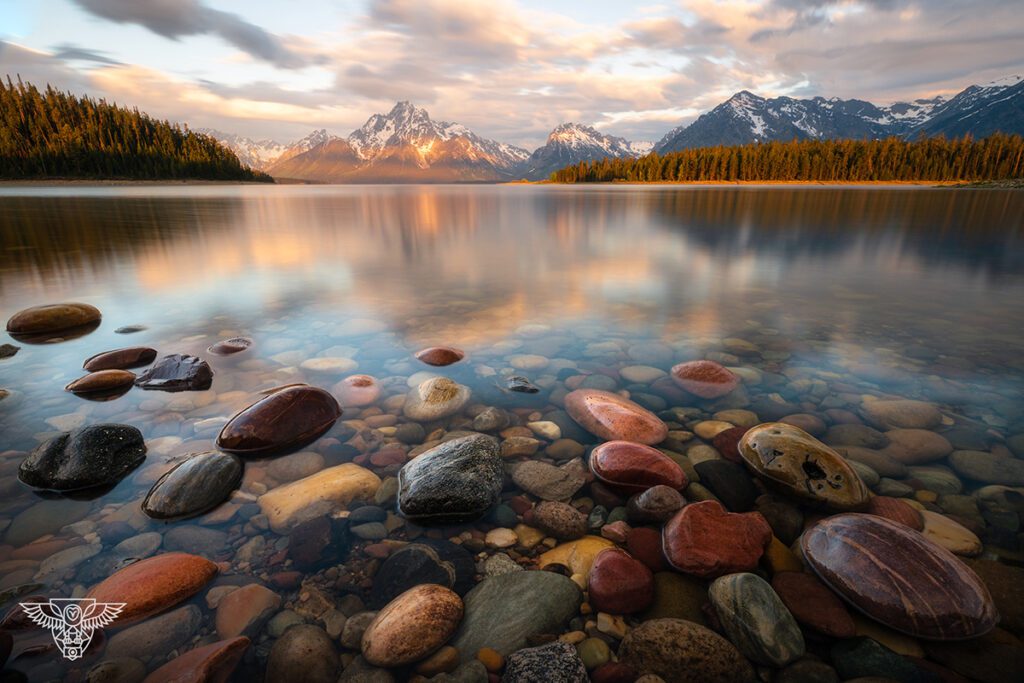
Tripod Example
For this shot, I had to get extremely low and use a tripod to accentuate the lines and textures in the rock. The scene also required focus stacking, making a tripod essential for creating a sharp and dynamic composition.
Shooting Hand-Held
Pros
Shooting hand-held is freeing.
Without a tripod, I tend to move more, explore more, and discover more. Some of my favorite surprise images were captured while wandering with a camera in hand and no particular plan.
Hand-held photography encourages spontaneity—something my inner artist appreciates. Not having a tripod often helps me connect with a scene more naturally.
In most situations, I recommend finding a composition hand-held first. Once you’ve found it, decide whether it makes sense to lock it down on a tripod.
Cons
The biggest limitation is light.
As conditions become darker, hand-held photography becomes increasingly difficult. Blue hour, astrophotography, long exposures, and technically demanding scenes often require the stability of a tripod.
While hand-held exposure bracketing and panoramas are possible, subtle movement between frames often results in lost image area during post-processing.

Hand-Held Example
The entire sky was blazing with color, and I knew the display wouldn’t last long. I shot this hand-held so I could quickly capture as many compositions as possible before the light faded away.
My Approach
I use both methods depending on the situation, but I primarily shoot from a tripod because I enjoy creating more technically complex images.
A tripod also encourages me to slow down and inspect every edge of the frame. As an art director, I learned to practice what I call “border patrol”—carefully checking for distracting elements and removing anything that doesn’t contribute to the image.
That’s much easier to do when the camera is locked in place.
What If the Composition Isn’t Obvious?
- Get low and go wide.
It’s amazing how quickly a scene can transform when viewed from ground level. Foreground elements become stronger, lines become more dynamic, and the overall composition often gains depth. - Get high.
Not that kind of high—higher up. Find a higher vantage point, extend your tripod legs, use a shutter delay, and see what happens. A few feet of elevation can dramatically change a composition. If conditions and regulations allow, this is also where drone photography can shine. - Change focal lengths.
I often start with a wide-angle or mid-range lens, but sometimes the answer is to go long. Pull that distant scene closer and see how it changes the relationship between elements.
I call this the Uncle Rico Technique. Throw the view “over them mountains.” Take State. - Just shoot.
Sometimes simply looking through the viewfinder helps simplify a scene. The act of photographing often reveals opportunities you didn’t notice with the naked eye.

Get Low Example
This scene was changing by the minute as a strong north wind pushed sheets of ice into beautiful piles along the shoreline. I got as low as I could without falling into the water to create a more engaging and dynamic composition.
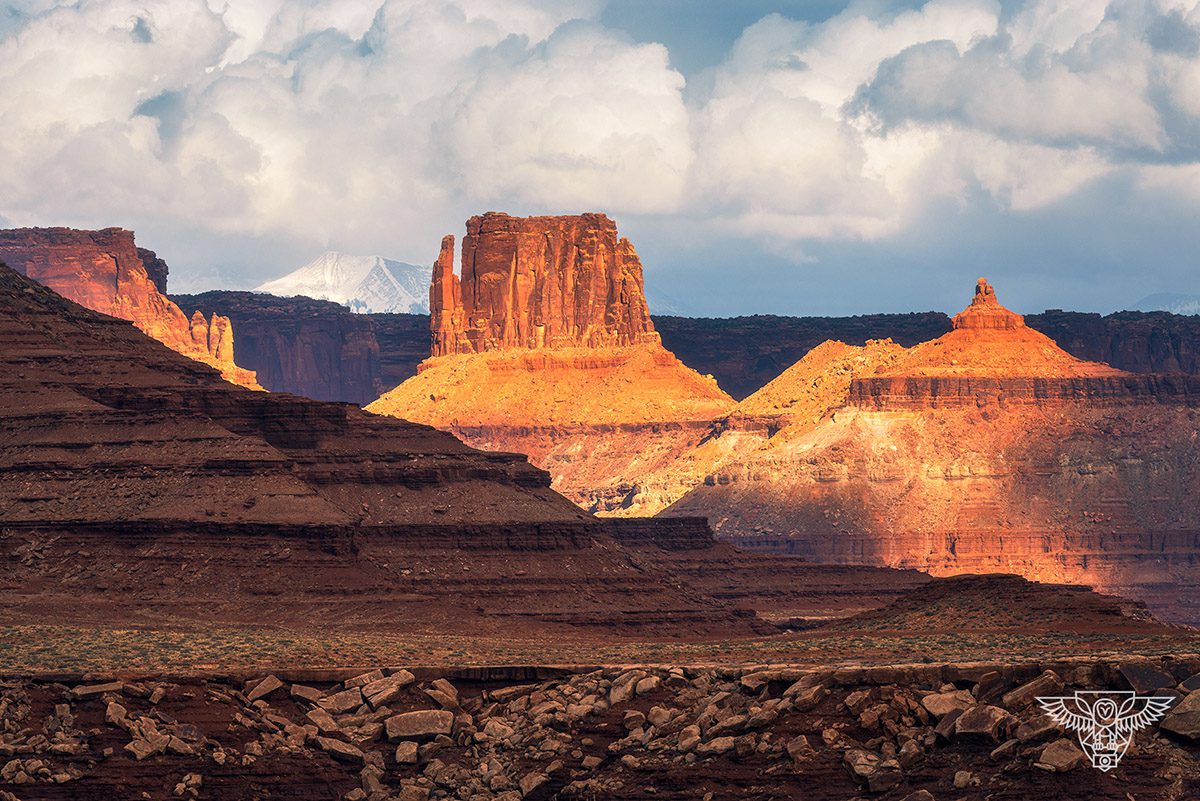
Uncle Rico Technique Example
The light was dancing across these buttes in Canyonlands National Park, and the best way to capture the scene was with a telephoto lens. Sometimes the answer is to go long and throw the view “over them mountains.”
We’ve now arrived at what I consider the most important aspect of compositional photography: shooting through feel.
Shooting Through Feel
I make it a point to avoid looking at photographs from an area before I visit it. I want to experience the location personally and discover it for myself.
This approach tempers expectations and makes the experience more meaningful.
Too often photographers see a great image and immediately want to recreate it. While there are certainly photographic and compositional rites of passage—Mesa Arch, Bar Harbor Lighthouse, or The Zion Watchman from Canyon Bridge (which is now prohibited)—nothing compares to finding a composition on your own.
Sure, some scenes naturally lend themselves to similar compositions. But my goal is always to experience and interpret a place my own way.
The most important compositional skill I’ve learned is knowing when to stop analyzing a scene and start experiencing it.
How does the scene feel?
How is it speaking to me?
How can I translate that experience into a visual frame?
This happened recently.
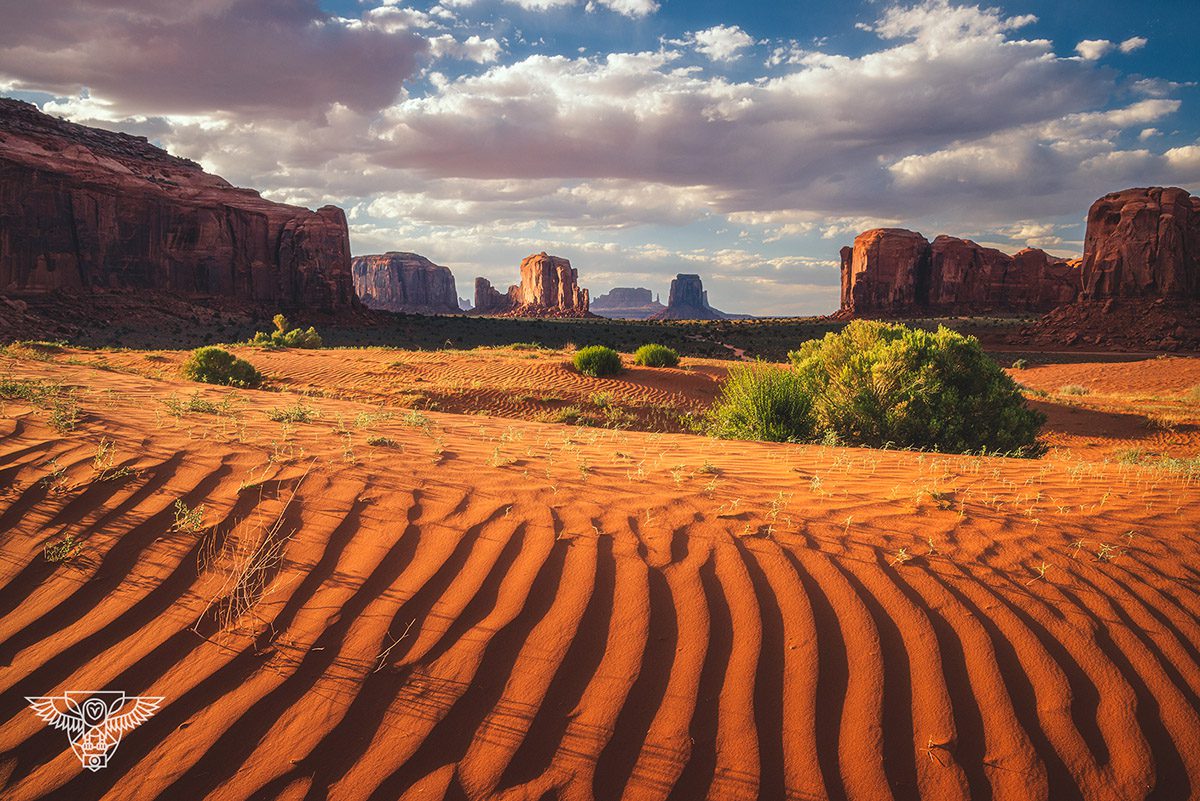
A few weeks ago, I was helping lead our Monument Valley and Native Cultures workshop. We took the group to one of my favorite locations in the entire valley.
The area was full of sand dunes, and what I love about sand dunes is their unpredictability. The landscape is always changing. Lines, light, shadow, texture, wildflowers—you never quite know what you’re going to find.
The group accepted the challenge and hiked up the sandy hill.
While leading the group, I turned on my “feelers” and started looking for a scene. The sunlight was still hidden behind clouds, but I tried to visualize how the light and shadows would interact once it arrived.
After stopping at several possible compositions, I found one that simply yelled at me.
It jumped out at me and I FELT it.
I literally felt it.
The sun was still hidden, but we got set up and dialed in our compositions. Then the sun emerged beneath the shelf of clouds.
I was led by feeling. By instinct. It came naturally.
Only photographs can describe the rest.
Shooting Through Feel Shot Example
I visualized this photograph before it revealed itself. Knowing the sun would eventually emerge from the left, I anticipated how the light, shadows, and lines would interact within the scene. When the moment arrived, it exceeded my expectations.
Anticipate the Shot
Shooting with feeling and intent allows you to anticipate what might happen before it happens.
Much like a professional athlete visualizing a play before it unfolds, photographers can benefit from seeing a photograph before it fully reveals itself. This is a skill that is often overlooked and underutilized.
Athletes have long used visualization as a tool to improve performance. By mentally rehearsing situations before they occur, they are often better prepared to react when the moment arrives. Photography is no different.
If you can visualize the scene in front of you and anticipate the conditions that may develop—sunrise light breaking beneath a cloud deck, light arriving from a particular direction, shifting shadows, or even rare atmospheric phenomena—you place yourself in a position to respond when those moments occur.
This isn’t about overthinking a scene. It’s about understanding it well enough to anticipate its possibilities.
In many ways, anticipation is an extension of shooting through feel. You are no longer reacting only to what is in front of you; you are responding to what the scene is suggesting may come next.
The Monument Valley example above is a perfect illustration. The photograph didn’t begin when the sunlight appeared. It began earlier, while visualizing how the scene might come together once the light arrived. The image was anticipated and felt before it ever existed.
Anticipating the Scene Example
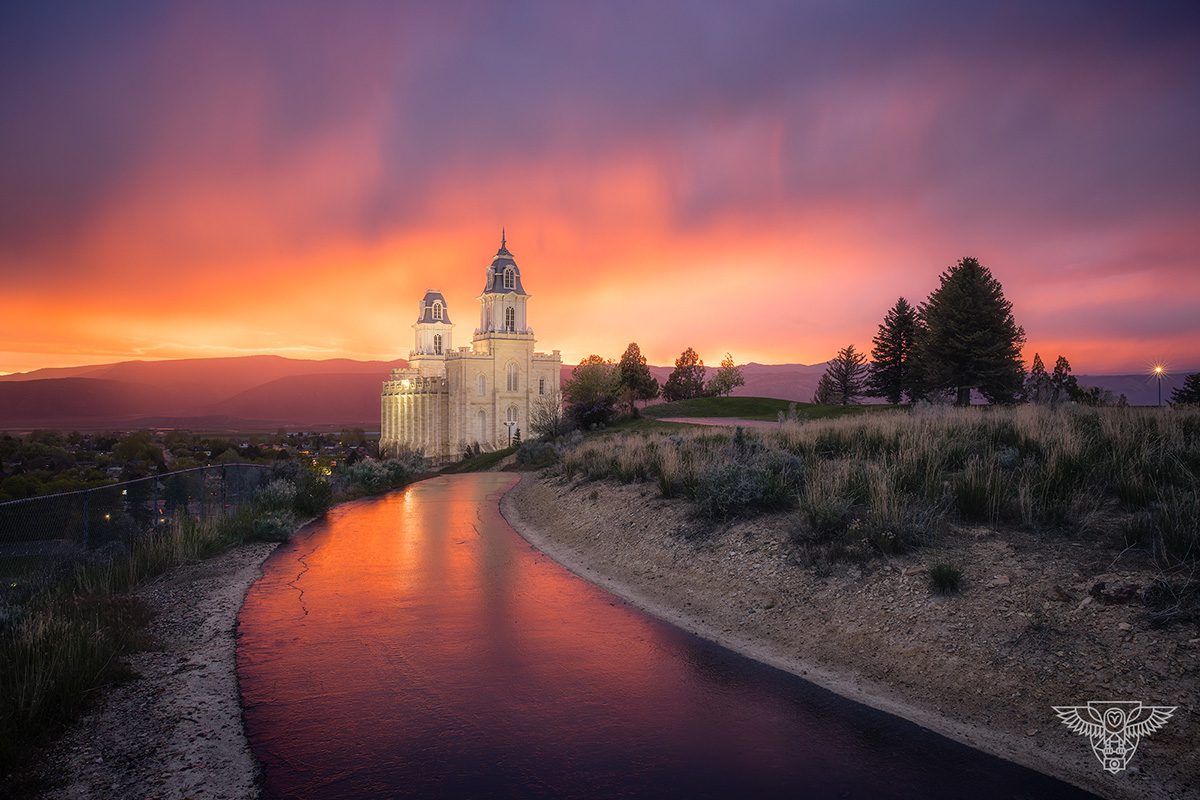
Manti Utah Temple. A recent thunderstorm left everything wet and reflective. I had a good idea shooting from this direction towards the sunset would warrant treasure. I then found this leading pathway stopped me in my tracks and immediately drew my eye toward the temple.
Why Shooting Through Feel Really Matters
One of the greatest benefits of learning to photograph this way is that your images become uniquely yours.
Like a fingerprint, they belong to you.
If a scene isn’t working or doesn’t feel right, let it go and try something else. Trust that instinct. If it isn’t working, don’t force it.
That confidence comes with practice.
I often tell clients that if something feels right, it’s worth exploring.
Once a scene begins speaking to me, that’s when I start noticing the compositional elements we discussed in Part 1. More often than not, those elements emerge naturally from the way the scene feels.
Stop Thinking About the Perfect Composition
There will be times in the field when you simply react.
There are no rules.
The sky is exploding with color in every direction and all you can do is photograph.
Shoot. Shoot. Shoot.
Don’t overthink it.
Some of my favorite images have come from these fleeting moments. I wasn’t calculating every compositional decision. I was simply responding to what was unfolding in front of me.
Final Thoughts
We’ve all heard someone described as a natural.
I believe there is truth in that—but perhaps not in the way we usually think.
We are all part of the same natural world we photograph. We come from it. We are connected to it. Because of that, the ability to recognize beauty and create meaningful compositions exists within all of us.
Learning to create strong compositions isn’t reserved for a select few. It simply requires dedication, practice, observation, and most importantly, trust.
Trust in your instincts. Trust in your experience. Trust in what the landscape is telling you.
Next time you’re out with a camera, try something different.
Don’t start by looking for leading lines, the Rule of Thirds, or the perfect foreground.
Start by experiencing the scene.
Let it speak first.
Then respond with your camera.
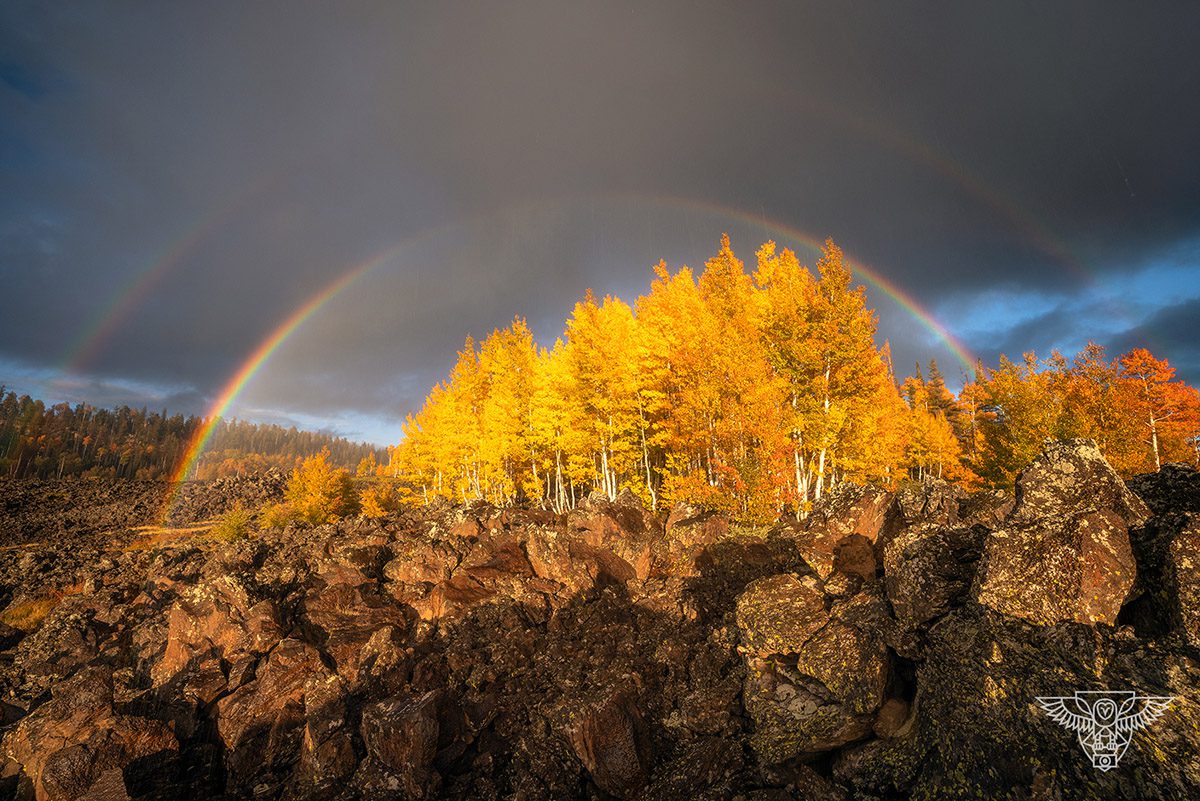
Preparation Meets Opportunity Example
For this photograph, I knew my best chance for a rainbow would be with the sun directly behind me. At the time it was raining hard, but I committed to the location and waited. Forty-five minutes later, the sun finally broke through the clouds, and because I was already in position, I was ready when the rainbow appeared.
As you develop that ability, you’ll find that the compositional tools from Part 1 begin appearing naturally in your work. The mechanics will still matter, but they will become a result of your vision rather than the starting point.
Good luck, and I hope to see you on the trail.
Learn more about author A.J. Rich.